

Cammy White - Street Fighter II

The Inspiration
I have always gravitated towards badass girls for my cosplays, no matter the fandom and no matter the background, and Cammy is just right up that alley! I have an extreme weakness for berets so her wearing one (plus super long braids!) was a really big temptation for me. She would involve a lot of new techniques for me to work with, such as a long wig and making a bodysuit, but I really like those kind of challenges so Cammy became part of my cosplans quite fast!
She became my project for Made In Asia because I wanted to bring a new character, one that didn't require lots of sewing or fabrics and that I could afford to make in just a few weeks. Even though I wanted to learn lots of new stuff for her I had my mind set on it and Cammy was ready to go!
The Making Of The Costume
Because Cammy has quite an easy wardrobe, I decided to not strain myself too hard and buy several things just secondhand instead of making them. I ended up buying leather army boots and a red military beret off Vinted to start with.
The boots needed some TLC, and after cleaning, polishing, putting new laces and adding soft insoles they look almost like new and on top of that they became quite comfortable to wear! The beret was good as it was, I cleaned it a bit but apart from that it was good to go.
The next challenge was the wig. I found a great one for a low price on Amazon and when it came it it was both the prefect colour and perfect length! I debated for a long time on how to actually get the braids done. I tried braiding it as it was but the lace from the wig was super visible and on top of that the hair really didn't follow orders and got all puffy. When I tried it on with the braids I also noticed that the weight of the braids really pulled the wig back and it kept slipping off, so my only solution was to try and make a helmet wig out of it for extra stability and to keep the hair nice and flat on the scalp. Since I never made a helmet wig I got a bit nervous, I looked everywhere for tutorials and finally found one but decided to first start on the bodysuit before diving into the hair project.
For the bodysuit I ended up buying superb green jogging fabric. I saw lots of examples made from lycra and spandex which was nice and shiny but after trying on a lycra bodysuit I had bought for patterning I found the fabric too flimsy. It was slippery and I didn't like the idea of seeing every single line from my underwear through the fabric; it made me feel a bit vulgar. I wanted to be able to wear normal underwear and a sports bra under my bodysuit and the jogging fabric was not only sturdy and soft, the fact that is was thicker also gave me the possibility to wear anything underneath without pesky lines! My mockup was a homerun right off the bat and fitted super well. I made it from the same jogging fabric with Minion print so my Carnaval costume for next year is done too!
The most tricky part of the bodysuit was sewing in the elastic at the legs and armholes. I saw lots of videos on it and got a pretty good idea of how to do it, but it still made me nervous in a way. I first attached the elastic on the Minion bodysuit to know for sure that everything worked and fitted how it should before I got to cutting and sewing the green bodysuit. Even though I had to curse extensively at my mum's overlocker because it kept slipping my elastic to the other side, I managed to fix it and a few snap buttons later my Minion bodysuit was done. On to the green one!
I was so happy that I trusted my gut feeling when I started on the green bodysuit! I only bought enough fabric to make one, because it was pretty expensive, and after some thought I decided to cut very wide seam allowances of 4 cm on all sides just in case. I overlocked the sides and shoulders together at the very end of my seam allowance, with the idea to sew on the pattern lines and trim it off later, but when I tried it on I got the surprise of finding out that the green jogging fabric was not even close to the stretchyness of the Minion fabric, even though it was sold as the same fabric! I ended up needing all of the extra seam allowance to make it fit. After my fight with the elastic and sewing on my snap buttons (for which I also took the extra 8 cm seam allowance between my legs) I tried it on again, only to find that the bodysuit fit perfectly around my waist and shoulders but the crotch was uncomfortably tight. To be comfortable I needed at least 5 cm more fabric between the snap buttons, so the unholy job of unpicking my snaps and seams was inevitable. After I added the extra fabric it did fit but by god was it uncomfortable to have thick seems between the legs. So I decided to make a new one after all...
To distract myself from that job I started my bracers. This went quite well: I made a pattern on my arm, cut it out, transferred it to foam and started heatshaping. The forearms from Suki's mannequin turned out to be the perfect size so I could let them set in peace while I made the knuckledusters. The only part that went wrong here was that in my optimism I cut the straps that go on the top and bottom of the bracers too short so I had to redo them but that was it. Since I used the foam from the foambox that I won with the Atsusacon contest I ended up mixing high and low density foam, and the difference was insane. I didn't really like working with foam because I can't get the finishing with the dremel right, either it digs holes or doesn't work or eats up the foam, but the high density foam worked like magic! It cut much smoother and instead of eating away, the dremel gave the little button things a super nice smooth finish. This definitely changed the way I saw working with foam and I know now that high density foam will be an enormous game changer for me!
I decided to sew in zippers to close the bracers, examples with velcro were not what I was looking for and zippers are easy to put on yourself. For priming I found a great tip to mix acrylic paint with tacky glue to keep it flexible, and after my test worked I started priming. two layers of primer, five layers of red spraypaint and a thick layer of varnish later my bracers and knuckledusters were done. All the layers of paint gave them a very even 'plastic' shiny look which was exactly what I hoped for. I attached the knuckledusters with velcro to the gloves that I ordered and that made me tick off a huge box on my to do list!
Then came the wig. I had done a ton of research on how to make helmet wigs, wig caps and everything in between so even though I was nervous I was confident that I could pull this off. First came the wig cap and I had so much fun wrapping my head in plastic and painter's tape! The best part was being bald and looking like Pitbull (minus the glasses). After I washed, dried and untangled my wig I was ready to go. I cut half the hair off and left the lower part because that was already well placed. I found the job of separating the hair in wefts and brushing glue in them very enjoyable and this gave me a sense of knowing what I was doing. After adding the batting to the top of the head I started attaching the wefts with hot glue. I got through the front of the head without much problems, but once I started with the sides I was doing every possible thing wrong: the hair fell the wrong way, the glue was burning my fingers, everything got tangled and it became a big goopy mess. I thought that hairspray would fix it but it only made things more wet and sticky. I tried to distract myself from it by trying to add wefts to the parting on the back of the head but that made things so much worse. In a last fit of trying to save things I tried the wig on, just to see if at least the size was good, and when I saw the mushroom it made on my head with the beret it pissed me off so much that I had a mental breakdown.
I was so ready to quit Cammy altogether: the problems with the bodysuit, the wig, time running out... In a phase of craze I ordered a new wig and started tearing the one I made apart to use that hair on the new one. With the shredding guitar solo from November Rain in the background I ripped all the wefts and batting off the wig cap and after that explosion I felt a bit better. I got a power surge from I don't know where and started over by cutting and adding new batting and drawing out the shape of the beret on it. I brushed out my wefts and glued them along that line, giving the wig volume on the sides and length but avoiding the top of the head. Somehow this magically worked and when I tried it on again I was even feeling slightly positive! I fixed the front of the hairline, added the strands that hang in front of her face (I was not going to risk everything to make then stand up), added some wefts for sideburns to hide my brown ones and decided to leave it at that.
Two days before the deadline I started on the third bodysuit, which magically came together without any issues. No unpicking seams or cursing at elastic, it all went smoothly. It was a bit long between the legs which I had anticipated, so I trimmed it down to the correct length, added snap buttons and got to work on the collar. After making two collar prototypes and pinning them both on the bodysuit I found that neither looked good as they both hung forward so I decided to leave out the collar and leave the edge of the neckline raw without any finishing. The fabric doesn't unravel and it gives a tough look so the third time was indeed a charm for this piece of clothing!
For the last two details I spent half an hour messing around with coloured foam sheets to make Cammy's beret pin, which turned out great, and wrapping the elastic bands on the braids with red spandex. Those details really finished off the costume and now Cammy was done!


The Crafting Details
Time it took to finish this cosplay: 1 month (September 2025 - October 2025)
Skills I learned for this cosplay: sewing a bodysuit, sewing bathing suit elastic, sewing zippers on foam, making flexible primer with glue, making a wig form of my head, making wig wefts, making a (half) helmet wig, learning to braid from under to over
Pricetag of this cosplay: €86,-
The Photoshoots
With special thanks to: Cosplayfotokes // Dallak.Photo // Adr_iphotos // Dream Cosmod // Md.Photose //

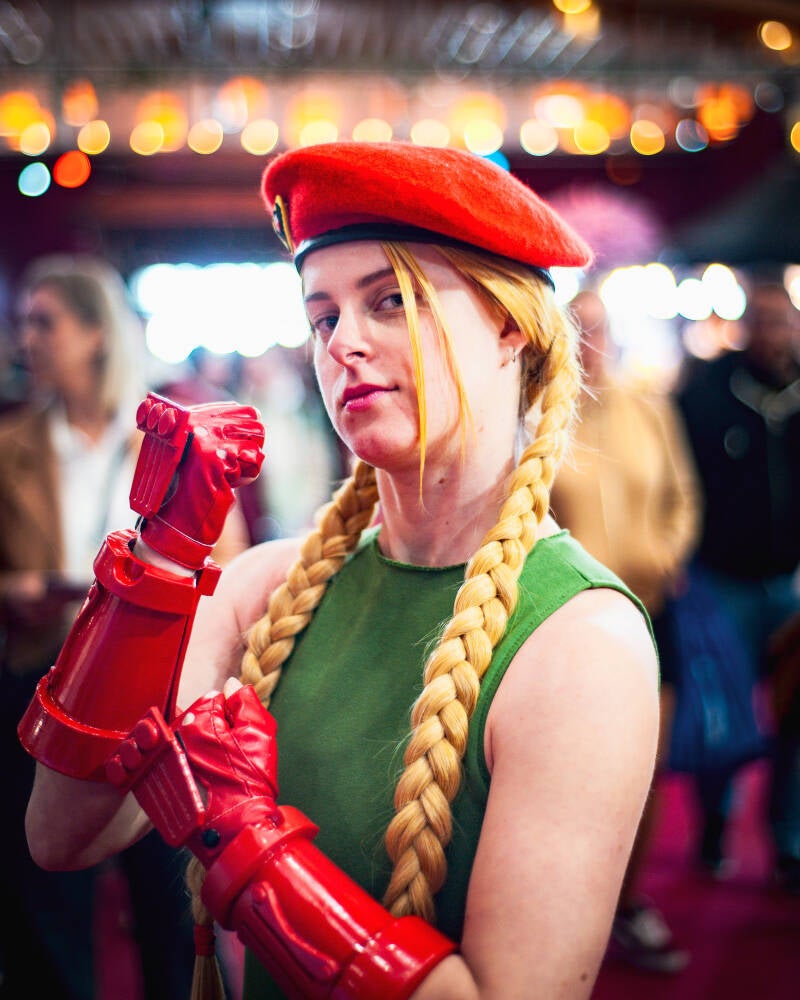
Picture by Md.Photose

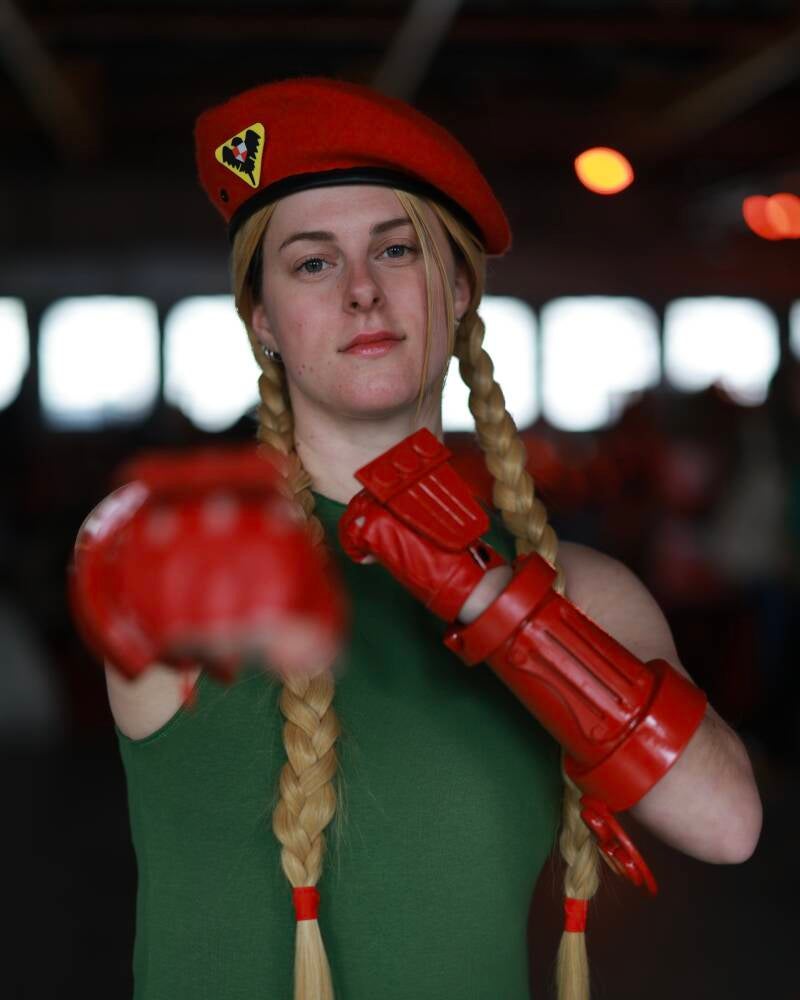
Picture by Md.Photose

Picture by Md.Photose

Picture by Md.Photose

Picture by Md.Photose

Picture by Md.Photose

Picture by Md.Photose

Picture by Md.Photose
Picture by Adr_iphotos

Picture by Dream Cosmod

Picture by Dallak.Photo

Picture by Dallak.Photo

Picture by Dallak.Photo

Picture by Cosplayfotokes
Picture by Cosplayfotokes

Picture by Cosplayfotokes
Maak jouw eigen website met JouwWeb